First, there are five main components to a firearm. Everythning else is simply an appendage.
- The Barrel is "the long round thing that the bullet travels through" when it is fired. The barrel is essentially a long tube, but accuracy can be added by making adjustments such as "rifling" (grooves that cause the bullet to spin). If a firearm can be boiled down to the most important component, the barrel is it.
- The Receiver is what the Bureau of Alcohol, Tobacco, and Firearms regulates. This is typically a housing that controls the firing of the cartridge. The receiver is often not specific to a caliber (diameter of a bullet). It connects the barrel to the firing group, and this "master housing" is crucial to the firing mechanisms operation.
- The firing group is what makes up everything from the trigger to the firing pin. These are the "mechanical" parts, orchestrating a chain of events that starts with a trigger pull, to the firing pin hitting the primer on the cartridge. On semi-automatic firearms, this mechanism also includes the ejection of a cartridge and the "chambering" of a new one in preparation to fire again. "Machine guns" are different animals - and I have not had opportunity to study them.
- The stocks, grips, and other "furniture" probably can be considered appendages to a firearm. They are the parts that make a rifle holdable, or useable. It's what connects the firearm to your shoulder or hands.
- The cartridge is often called a "bullet" by people that aren't familiar with firearms. Bullets are actually part of a cartridge, and the bullet is what hits people. The rest of the cartridge doesn't follow with it.
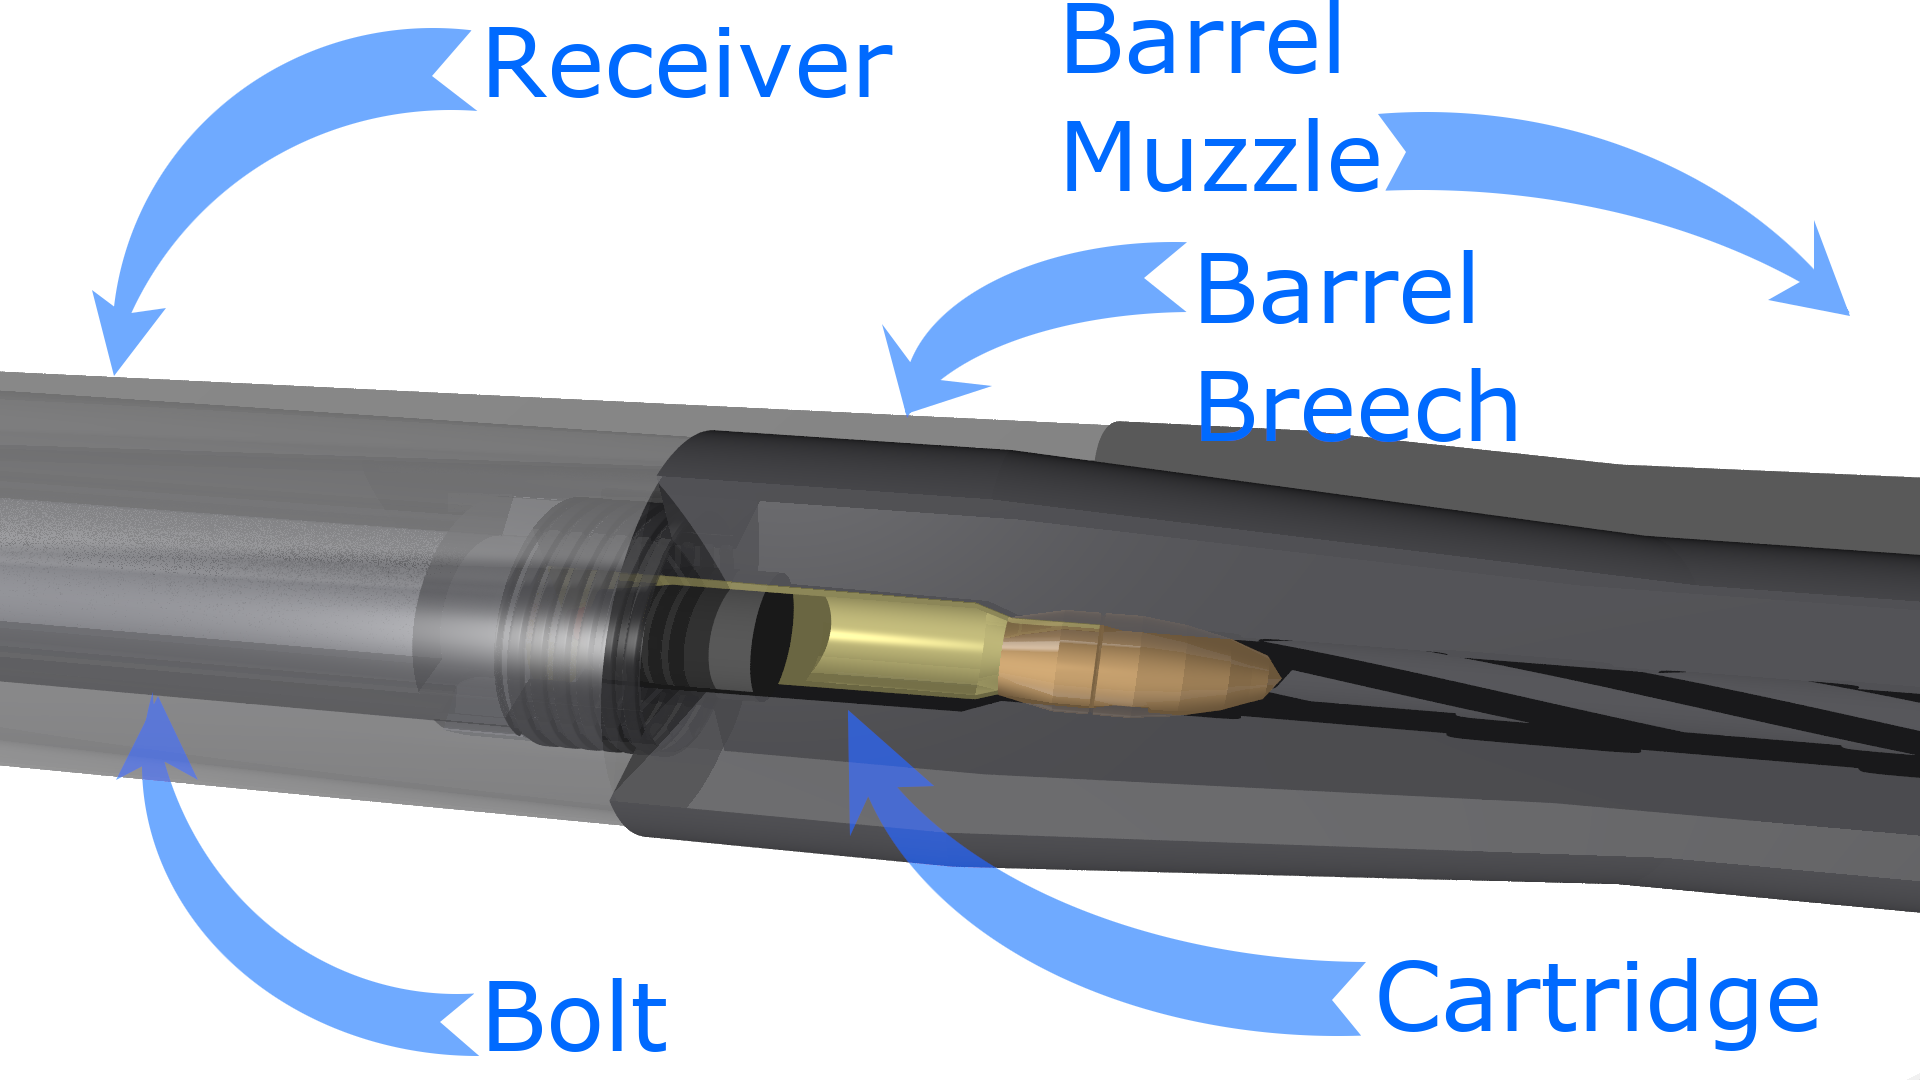
In the following chart, the "bolt" is part of the firing group, the receiver and cartridge are marked, and the barrel is broken down into "breech" and "muzzle". The breech is the end the bullet is inserted, and the muzzle is the exit end.
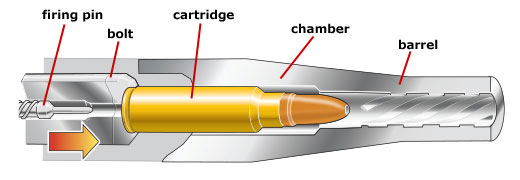
Another chart happily stolen from somewhere else (and adjusted for this document) is also added here. The cartridge is marked, the barrel is marked (the chamber is a cavity in the barrel), the firing pin and bolt are part of the firing group, and the receiver is completely unmarked (it is what houses the firing pin and bolt, and is connected to the barrel).
The Barrel
As noted previously, the barrel is essentially a long tube or pipe. Also noted earlier, the "chamber" is the cavity in the breech end of the barrel that accepts a loaded cartridge. When the cartridge is loaded, it is either ready-to-be-fired, or has already been fired. The loading of a cartridge into the chamber is often called "chambering" a round. The other end of the barrel is called the "muzzle". When you hear of a "crown", this is the muzzle end, and is a bevel on the inside in an attempt to protect the barrel, and also to try and keep redirecting the expanding gases from the explosion pushing on the back of the bullet as it leaves.The two ends are called the "breech" and the "muzzle". The muzzle end includes a "crown", e.g. :
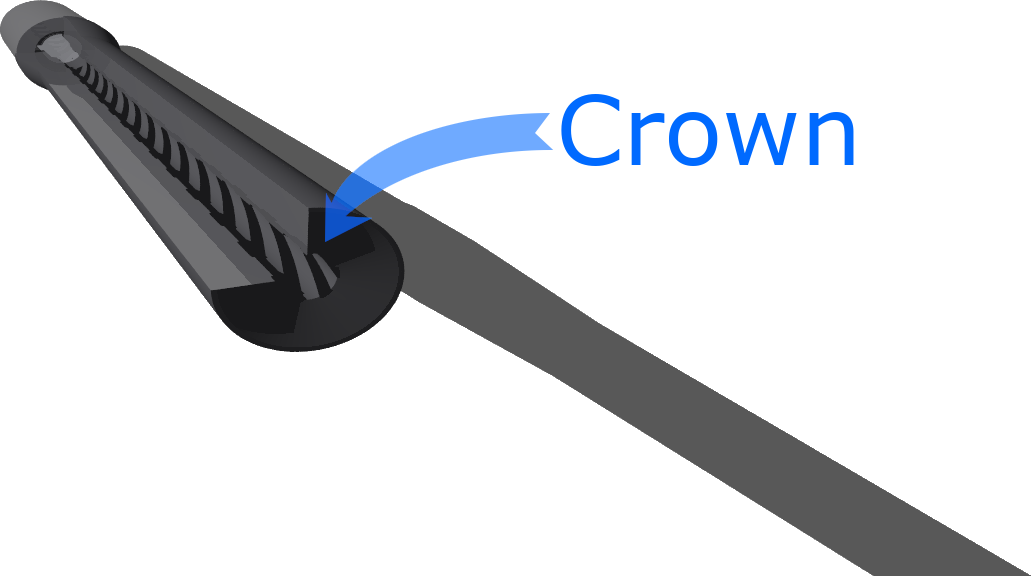
If the muzzle end is threaded, this is where you would install flash hiders, silencers, or muzzle brakes.
Let's take a look at the chamber. Here’s where a lot of people get lost. In fact, if you take a look at the following three charts, you will see that everyone puts what is called the “lands” in different places.
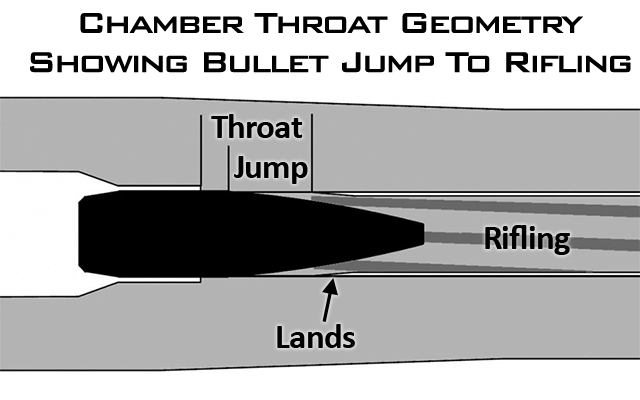 Figure 1 |
 Figure 2 |
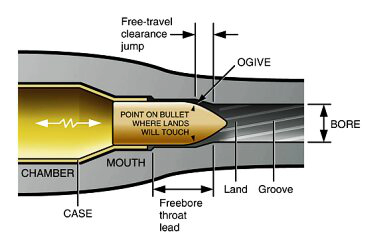 Figure 3 |
In figure 1, we see the lands placed as the ramp from the throat to the rifling. The distance between the ogive of the bullet start (where it meets the caliber diameter) to where the ramp starts is called the “jump”. In figure 2, we see the land is just part of the rifling, there is no “jump”, and the ramp is called the “bullet free-travel”. The throat is called the “freebore”, but does not include the ramp to the rifling. In figure 3, we see the land as part of the bore, but the ramp is now called the “jump”. The throat now includes the ramp. So, let’s get some things clear.
The throat is the area of the chamber extending from where the shell/casing ends to where the rifling/bore is at the diameter of the remainder of the bore. This includes everything from the freebore, jump, and lands.
The jump is the distance where the bullet starts the curve from full caliber diameter to the point (start of the ogive) to where the ramps begin to form leading to the rifling. It is called the freebore as it has no rifling (it will be a slightly larger diameter than the bore itself). The term “jump” comes from the fact that the bullet has to jump from it’s position into the chamber. As the freebore is a larger diameter than the rifling, it means the bullet has the potential to jump around until it enters the bore/rifling.
The Receiver
I'm simply going to define a receiver. Every type of gun has a different receiver, and they all operate differently. Because of that, I won't go into a lot of detail here.The receiver is the housing that connects everything together. On AR-15's, the receiver is broken into two pieces to facilitate cleaning while in the field. THerefore, you can see terms such as "upper receivers" and "lower receivers". Considering that receivers are the glue that holds everything together, all of your trigger mechanisms, bolts (the piece that holds the cartridge and inserts it into the chamber of the barrel), batteries (or often called "magazines" and even "clips" in gangster land). Rifles that do not have detachable magazines usually have internal forms of a magazine.
Typically, the breech end of the barrel will thread into the receiver. It needs to be tight, and tolerances have to be met, or added wear on the firearm can occur. There are methods to trueing this interface up in order to get more accuracy. If you want to see a number of tools or processes on how to do this, obtain a copy of John L. Hinnant's book on The Complete Illustrated Guide to Precision Rifle Barrel Fitting. It is considered by many to be the bible on making a rifle accurate.
The Cartridge
Outside of the firearm world, the cartridge is wrongfully called the "bullet". This is critical to understand because the bullet is actually part of the cartridge.There are many forms of cartridges, but most of the terms apply interchangeably. There are some terms that are dropped if features are not found in a specific cartridge.
Here is a quick diagram of a pistol bullet, also happily stolen from another site. The diagram is very simply in that it labels the components that make up a cartridge. First, the "casing" is the shell that keeps it all together before it is fired. In the butt end of the casing is what is called the "primer". The firing pin (a long and slender pin in the firing group that impacts the butt end of the casing) is slammed against the "primer", which ignites the propellent inside the casing. This propellent is often called "powder", and the name comes from it's use in "black powder" rifles. Technology has introduced "smokeless" powders commonly used today. On the business end of the cartridge is the actual bullet, or projectile.

A rifle cartridge usually has added features such as a "boattail", a "neck", and a "shoulder". They are often tapered to allow higher pressures because they are filled with more powder in an attempt to push a projectile or bullet father. Casings take the form of "straight-walled", "tapered", or "necked" cartridges. The rifling cartridge diagram below is from a 30-06 - essentially a long cartridge holding a bullet that is 0.30" inches in diameter (it's actually 0.308", but I digress). Let's see what we have :
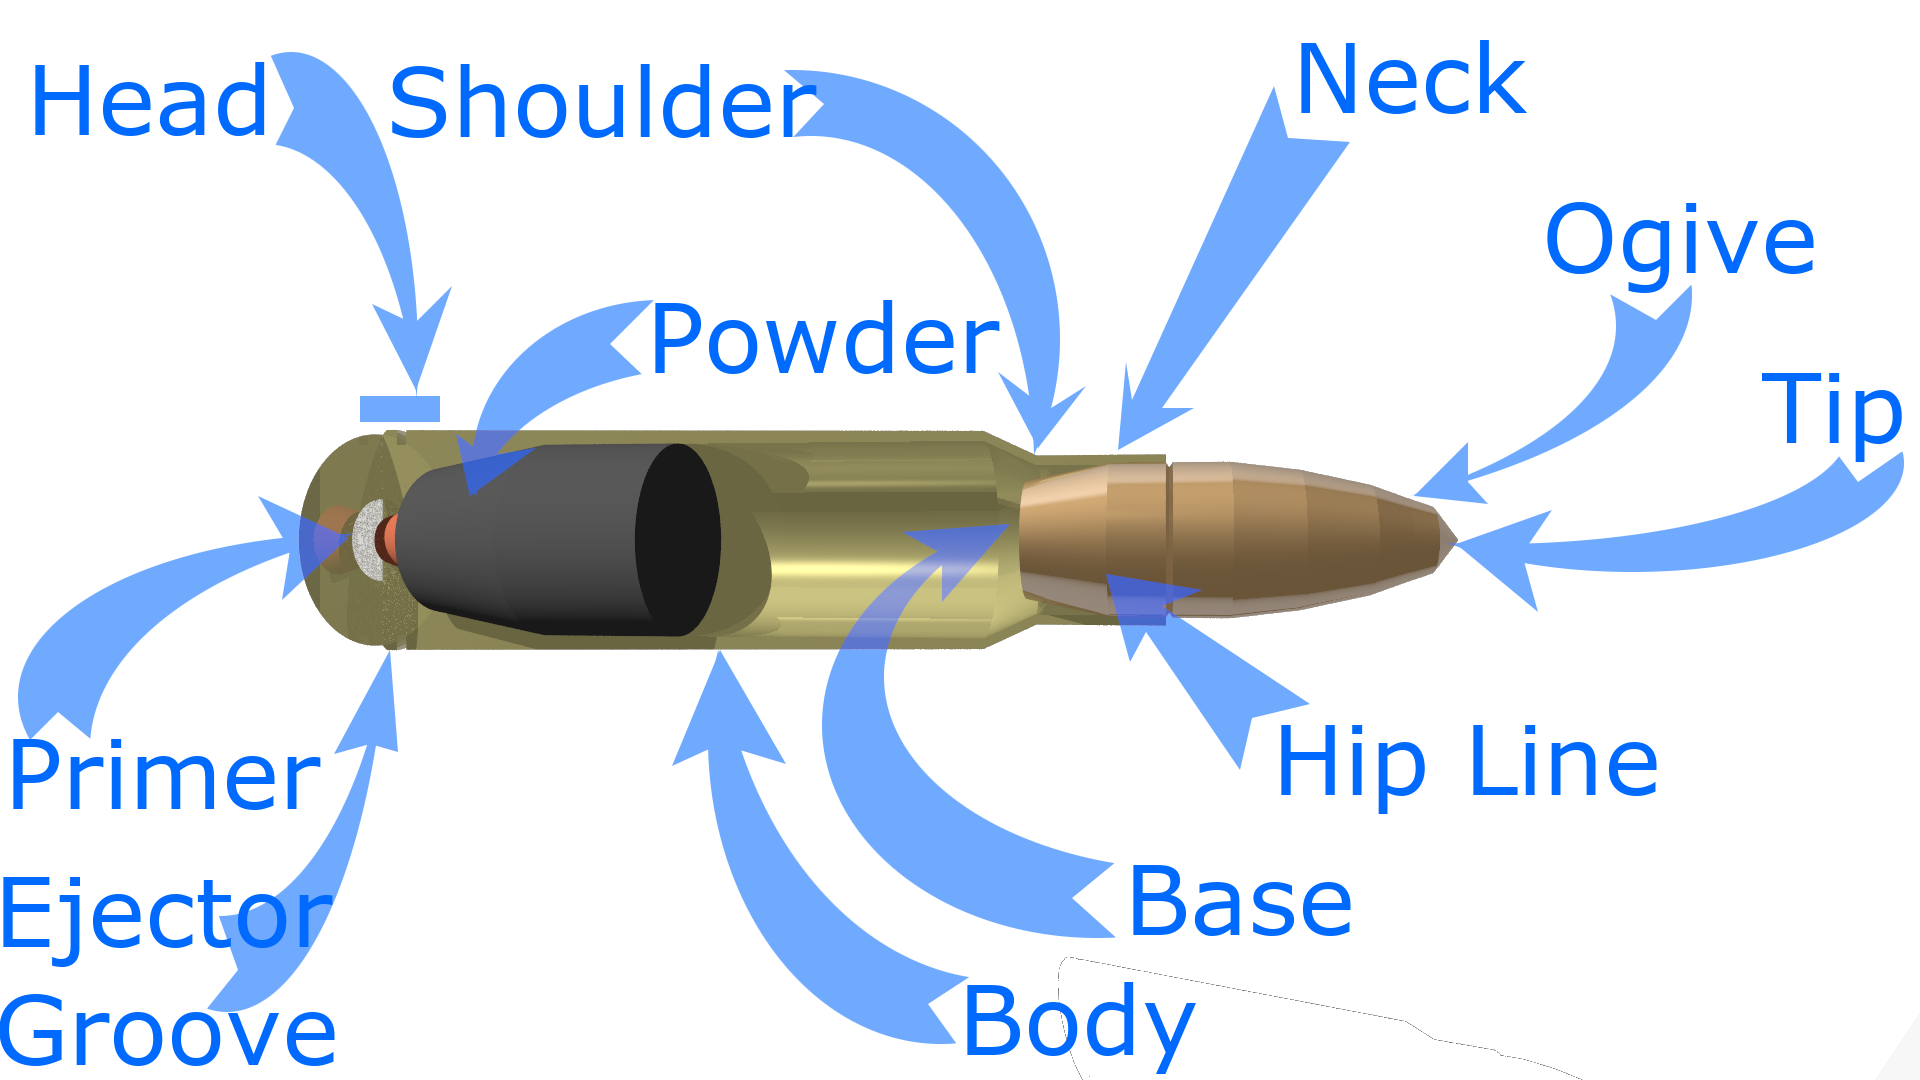
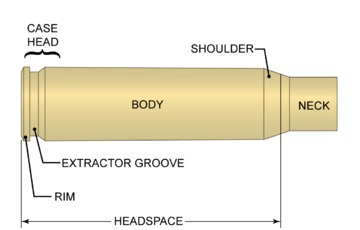
The casing in a rifle typically has a neck and a shoulder added. The shoulder is the secion of the casing where it drops in diameter to something that can hold onto the bullet, and the neck is the area of the case that actually binds to the bullet. When a case does not have a lip with which to grasp the bullet that is larger than the case wall, an ejector groove has to be used. This is used to extract a fired (or spent) casing from the chamber in preparation to have another one added. See below for some of these case-specific definitions.
Now to the bullet, or projectile.
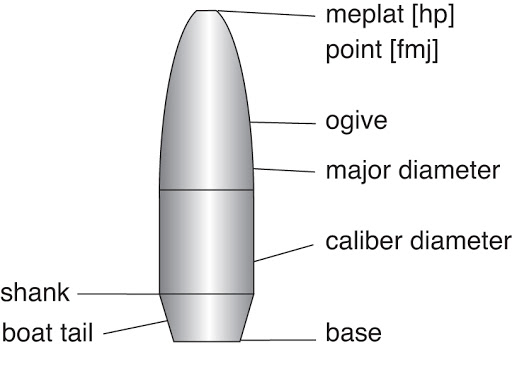
The tip of the bullet is usually called a “point” (you know, like missiles, the pointy-end goes up). You’ve heard the term “hollow point” – this is just a case in which the point is omitted to increase the expansion of the projectile on impact, and in this case the official term is "meplat", but point or tip is still perfectly valid. The ogive is the leading, curved surface of the bullet. Ogive is actually a French term coined to describe the pointed curve of a gothic arch in architecture (it’s the leading definition, actually). Consequently, it is used to describe the pointed, curved arc of a bullet as well, even if there is no point on the bullet (e.g. a .30-30 lever action cartridge). The caliber diameter should be to specifications, and should match the barrels bore (with clearance). The shank of the bullet is also called a “hip”. In the above diagram is a term called the boat tail – and not all bullets have a boat tail. If the caliber diameter goes directly to the base, the boat tail is omitted.
Reloading
Reloading is not cheap. It does not make shooting easier on the pocket book/wallet. Just get that out of your head right now. You cannot make your own ammunition cheaper than a full blown manufacturing facility can do it all - that just won't happen. Your mission is actually to adjust the parameters of your ammunition to have it mated perfectly with the gun that is shooting it. Reloading is the art of adjusting the parameters until you find ammunition that behaves the best for how you shooot, and manufacturers can't do that for every individual shooter. When you get into "reloading", your mission is to :- Remove any primer still in the case (new cases won't have them).
- Ensure the cases are clean.
- Ensure the cases meet specifications in length and diameter. This step is called "sizing". This is one of the "parameters" you can play with, but beware that the tolerances are extremely tight - it's probably not a parameter you want to play with if you haven't done some incredible math on your specific rilfe.
- Insert the primer into the pocket.
- Fill with a specific amount of powder. This is another parameter to play with. There are a number of powders that all burn at different rates that are available. Finding the right one is a bit of a trial and error, but you can get close using charts and diagrams that usually come with a reloading "kit".
- Place the projectile into the case. This is another parameter - bullet seating is to be done according to that "lands", and I feel this is more critical than the actual headspace.
- Crimp the case around the projectile to hold it all together.
At the base end, we have the "case head". This is also referred to as the base of the case. This is required because one of the most common terms you will hear when you start reloading is "headspace". The headspace is the distance from the but end, including this "case head", all the way to the shoulder. If you do not get this distance right in your rifle, the bullet has the potental to jump around inside the chamber, and could lose accuracy. This is why the term "head space" is used to such an extent. It is rumored that this distance, while critical, is not as critical as many people try to make you believe. The longer that freebore space is, the more opportunity that the bullet has to move off-axis. The farther off-axis it becomes, the longer it takes for the bore and the rifling to correct this and re-center the bullet. Getting this measurement is a bit more tricky. This means that you actually need to worry about how far the bullet has to travel before it connects with the lands.
Allow me to introduce a new term, “chasing the lands”. This is when someone tries to get so close to the lands that they begin chasing a unicorn. Again, while this is critical, you should not be chasing perfection. Trying to get closer than close enough is an exercise in diminishing returns. Getting closer doesn’t always help, and in fact causes problems if your bullets are not centered to perfection. The actual target you want to shoot for is about 0.015” of jump space for the ogive to the lands. This will allow the chamber to quickly correct problems caused by tolerances, allowing the lands to do their job.
These two measurements will give you the most bang for your buck (no pun intended). So, how do we get the measurements? We use a headspace gauge. They make them for bullets, and you will need one when you manufacture your ammunition. But before you can manufacture, you need to know the rifle headspace. I've listed under the tools section how you can easily make one using a gun cleaning coper brush and a spent casing.
You will need a second spent casing to get your seating depth. This tool would be used to get the distance to the lands. When you are done, you want the bullet used to be about 0.015" shorter than this measurement.
If you change the bullet to a new type, style, or manufacturer, you will have to re-measure using the same tools you used at first. You may find that a manufacturer changes the bullet without changing a product number, so every once in a while, when ordering a new package of projectiles, re-measure this seating depth.
Tools
-
Rifle Headspace Measuring Tool
Rifle Bullet Seating Depth Tool
Reloading Concentricity Tool for checking bullets being seated as axially centered as possible.